
You Built a Great Home Gym, but now You’re Feeling Its Ceiling.
It never hits hard at first, but gradually you start to feel the repetitive limits of each workout. You might have a rack. Maybe a barbell, a set of plates, some dumbbells. And it’s always exciting at first and always enough at first. Things were moving, progress was being made, the gains were flowing. Then somewhere along the way, you started hitting a wall. Not in strength, but in options.
For your goals, the bench press is giving you everything it’s going to give you. Maybe you want to add lat work but can’t quite replicate the feel of a cable pulldown with a resistance band. And isolating smaller muscle groups — the refinement that will take your physique to a new level — feels like a dead end.
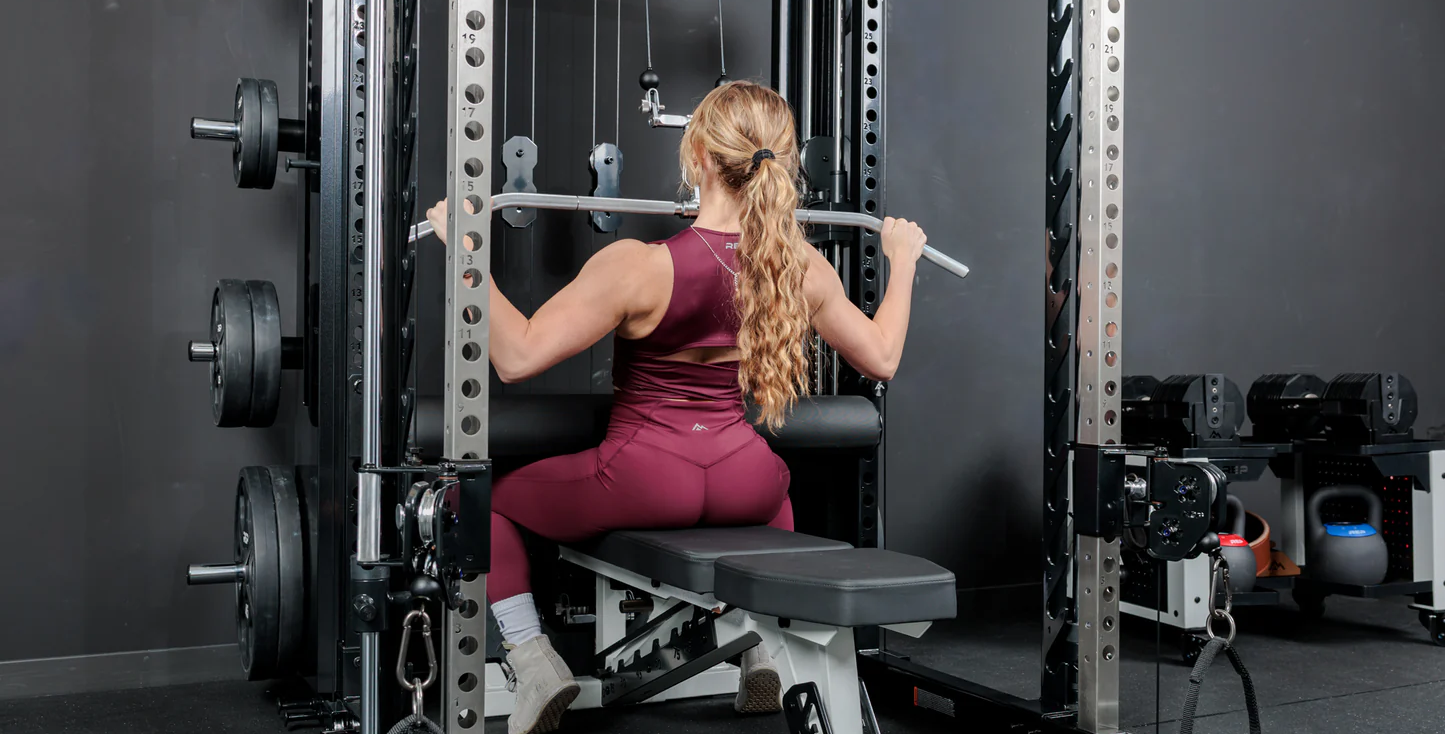
Fortunately your training doesn’t have to stagnate because these are all gaps a power rack cable attachment can fill. It’s not a luxury upgrade. It’s the kind of piece that elevates a free weight setup into a space that feels like a complete training environment. This article breaks down exactly what that unlocks — in your training, your programming, and your long-term results.
What Is a Cable Attachment on a Power Rack?
Not all cable systems are designed the same or built equal, so the terms can get confusing fast. Here’s what we’re describing under the spectrum of cable attachments.
Integrated functional trainers are cable machines built directly into the rack structure — you’re essentially buying one combined unit. These tend to offer the most stability and the widest range of cable angles, but they’re also the biggest investment and the largest footprint.

Cable pulley add-ons are accessories that bolt onto an existing rack — typically a lat pulldown bar and low pulley system that attaches to the uprights. These are the most common entry point for home gym owners who already have a rack and want to add cable capability without replacing everything.

Lat pulldown/low row attachments are often sold as a combined unit: a high pulley for overhead pulling and a low pulley for rowing movements. This pairing gives you the vertical and horizontal pull patterns that cables are best known for.

DIY pulley systems exist too — single-cable setups with a weight horn and pulley that attach to a rack’s uprights. These are cost-effective but limited in movement variety.

When someone says “power rack with cable attachment,” they’re most often referring to that second or third category — an existing rack upgraded with a bolt-on cable system. That’s the setup this article is built around.
Takeaway: Before you buy, know what you have. A bolt-on cable attachment is the most practical path if you already own a rack — don’t spend money replacing what’s already working.
Free Weights Alone Can’t Compare — And There’s a Biomechanical Reason
To be clear; every tool designed for physical fitness has its strengths and weaknesses. So the point I’m about to make isn’t about opinion. It’s about physics.
Poor resistance curve
When you lift a barbell or dumbbell, the resistance follows gravity — meaning it pulls straight down, always. That’s useful for a lot of patterns, but it becomes a problem when the direction of force doesn’t align with the direction your muscles are working. During a dumbbell lateral raise, for example, you get almost no tension at the bottom of the movement (where the muscle actually needs to load) and maximum tension at the top (where you’re weakest). That mismatch is called a poor resistance curve.
Cables fix this by maintaining constant tension throughout the entire range of motion. Whether you’re at the start, middle, or end of a rep, the cable is pulling against you. That consistent mechanical load is one of the primary reasons cable training is associated with better hypertrophy outcomes — your muscle spends more time under meaningful tension.
Joint angle problem
There’s also a joint angle problem that free weights can’t solve. Your lats, for instance, are best loaded in a position of shoulder flexion — pulling from overhead. A barbell row gets some of this, but the bottom of that movement still has the same gravity-limitation problem. A lat pulldown on a cable keeps the load meaningful at every point in the range.
For rehab and injury prevention, this matters even more. Lower-impact, constant-tension movements are often the first exercises back from a shoulder, elbow, or knee issue — and cables provide that without asking you to stabilize a heavy barbell while you’re still recovering.
Related post: Cable Machine Alternatives for Home Gyms
REMEMBER: If you’ve hit a plateau in muscle development with free weights alone, the issue may not be your programming — it may be missing the constant-tension stimulus that cables uniquely provide.
Power Rack Cable Attachment Exercises: The Movement Patterns Your Training Needs
This is where things get practical. A power rack with cable attachment doesn’t just add a few extra exercises — it opens entire movement categories once unavailable with just barbells and dumbbells.
Vertical Pulls: Building the Wings Your Back’s Been Missing
Lat pulldowns are the foundation here, and for good reason. No free weight movement loads the lats in the lengthened position the way a pulldown does. This is the primary driver of that V-taper look — the width that makes shoulders appear broader and the waist narrower.
Pair it with straight-arm pulldowns for pure lat isolation that a barbell can’t touch.
Horizontal Pulls: The Rear Delt and Upper Back Work That Changes Your Posture
Seated cable rows allow you to load horizontal pulling with constant tension — something a dumbbell row can imitate but never fully replicate.
More importantly, cables make face pulls a reality, and face pulls are likely the most underutilized movement in most home gym programs. The external rotation and rear delt loading that face pulls provide is essential for shoulder health and upper back thickness. I tell every client: if you’re pressing, you need to be face pulling.
Pushes: Chest and Tricep Development That Dumbbells Can’t Finish
Cable chest press hits the pecs with constant tension across the full range — particularly valuable at the start of the press where dumbbells go nearly slack.
Tricep pushdowns are the go-to for tricep isolation and allow for volume accumulation without the joint stress of skull crushers.
Isolation Work: The Detail Movements That Actually Finish a Physique
Cable curls maintain peak tension through the whole bicep curl — the dumbbell loses tension at the top; the cable doesn’t. Cable lateral raises are, in my opinion, superior to dumbbell lateral raises for shoulder width development specifically because of that tension consistency from the very bottom of the movement.
And cable flyes allow chest work in the fully lengthened position in a way that dumbbell flyes approximate but don’t nail.
Core and Rotational Work: Functional Patterns You Can’t Load Otherwise
The Pallof press is a cable-only movement — there’s no real dumbbell equivalent. It trains anti-rotation, which is one of the most important functions of the core but also one of the most neglected in free-weight-only setups. Cable woodchops add rotational loading that translates directly to athletic performance and real-world movement.
Lower Body: Additions That Define a Complete Program
Cable kickbacks for glute isolation and cable pull-throughs as a hip hinge variation give you lower body options that don’t require an additional specialty machine. Pull-throughs in particular are excellent for teaching the hip hinge pattern — often more accessible than a Romanian deadlift for newer lifters.
Takeaway: Map your current training to this list. Every category you’re missing is a gap in your programming — and likely showing up as a lagging muscle group.
Training Splits That Possible With Power Rack Cable Attachment Exercises
A home gym without cables is essentially limited to strength-focused splits — heavy compound work with free weights. That’s not nothing, but it’s incomplete for anyone whose goal goes beyond raw strength.
PPL: Push/ Pull/ Legs
With power rack cable attachment exercises, push/pull/legs (PPL) becomes genuinely complete at home. Your push days get chest press and tricep pushdowns. Pull days get lat pulldowns, cable rows, face pulls, and cable curls. And leg days gain pull-throughs. The split works because every major pattern has a cable option that fills the gaps free weights leave.
Upper/ Lower Split
Upper/lower splits gain the same flexibility. You’re no longer limited to bench, row, and overhead press on upper days — you can add isolation work that targets specific muscle groups with precision, which is what the hypertrophy literature consistently supports.
Classic Bro Split
Bodybuilder-style bro splits — traditionally the domain of fully-equipped commercial gyms — become possible with power rack cable attachment exercises. A dedicated arm day needs cable curls and pushdowns. A shoulder day needs cable lateral raises and face pulls. A back day needs lat pulldowns and seated rows. These aren’t optional extras; they’re the movements that make those specialized sessions worth running.
The bigger picture: cables and free weights aren’t competing systems. Barbells and dumbbells build strength and load the big patterns heavy. Cables add constant tension, isolation precision, and the angles that compound movements miss. Together, they cover everything a commercial gym does.
Related Post: Best Strength Training Programs for Beginners
REMEMBER: If you’re running a PPL or upper/lower split at home and feeling like it’s incomplete, the missing variable is almost always cable work. Add it and your programming becomes genuinely commercial-grade.
Space and Setup: What a Real Home Gym Needs to Make This Work
Let’s get practical about the physical reality.
Ceiling height
This is the first constraint. For lat pulldowns specifically, you need enough clearance to sit upright under the cable with your arms extended overhead — typically a minimum of 8 feet, though 9 feet is more comfortable. Measure before you commit to any integrated system that mounts at the top of the rack.
Footprint
The footprint will depend heavily on what style of cable attachment you’re adding. A bolt-on lat pulldown/low row system that attaches to the back of your rack adds minimal floor space — maybe 12–18 inches of depth behind the rack. A functional trainer integrated into the rack doesn’t change the footprint at all. A standalone cable tower added to a rack setup can double the square footage you’re working with.
Weight stack vs. plate-loaded
The decision between the two is more than a cost question. Weight stacks are more convenient — you pin a weight and go. Plate-loaded systems require loading and unloading between exercises, but they’re less expensive, often lighter for shipping, and use the same plates you already own. For a home gym where you’re often training alone and switching movements frequently, the convenience of a weight stack is worth real consideration.
Single vs. dual pulley
This matters for exercise variety. A single high pulley handles lat pulldowns and tricep pushdowns. Adding a low pulley opens cable rows, curls, and pull-throughs. Dual independent pulleys — the kind on a full functional trainer — allow cable crossovers and unilateral work at any angle.
Takeaway: Measure your ceiling and map your floor space before researching specific products. Those two constraints will eliminate most options before you even get to price.
What to Look for When Buying a Power Rack Cable Attachment
When shopping for units that support power rack cable attachment exercises, you need to be aware of the criteria that will ensure your satisfaction and avoid unnecessary returns.
1) Weight capacity of the pulley system
Pulley-system weight capacity isn’t the same as the rack’s weight capacity. Many cable attachments are rated for 150–200 lbs of plate load, which feels like a lot until you’re doing lat pulldowns and want more resistance. Look for 200 lbs minimum; 250–300 lbs is better if you’re experienced.
2) Cable ratio
This determines how weight on the stack translates to resistance at the handle. A 2:1 ratio means 100 lbs on the stack feels like 50 lbs of resistance — this makes the system feel lighter and the weight increments smaller, which is great for isolation work but limiting for rows and pulldowns where you want to move more load. A 1:1 ratio means what’s on the stack is what you feel. Know which ratio a system uses before assuming its weight capacity meets your needs.
3) Attachment versatility
You’d be surprised how important this point is. A system that comes with only a lat bar and a low row handle immediately limits your power rack cable attachment exercises to a handful of movements. Look for systems that include — or are compatible with — a range of handles: single handles, rope attachments, ankle straps, V-bars, and tricep bars. The attachment ecosystem is where the exercise library lives.
4) Build quality of the pulley and cable
This is where cheap systems will inevitably fail you. Steel cables fray, plastic pulleys crack, and cheap bearings bind. Look for sealed ball bearing pulleys and aircraft-grade steel cables — not because those sound impressive, but because they’re what determine whether this system still works correctly in three years.
5) Brand compatibility
The reality of a brand’s product is a constraint most people discover too late. Some cable attachments only work with the manufacturer’s own rack — proprietary mounting points that don’t transfer. If you have an existing rack, confirm compatibility before purchasing anything.
Takeaway: Pull the cable ratio and the included accessories list for any system you’re considering. Those two specs will tell you more about real-world usability than the price tag will.
Popular Options Worth Knowing
These aren’t reviews — they’re starting points for further research based on what the home gym community consistently respects.

REP Fitness (specifically the FT-100 and their cable attachment add-ons for the PR-4000 and PR-5000 racks) has become a go-to for serious home gym builders who want quality without commercial-gym pricing. Their cable systems are well-regarded for smooth operation and solid attachment compatibility.
Titan Fitness offers bolt-on cable attachments for their T-2 and T-3 rack lines that are among the more affordable well-built options available. If you already own a Titan rack, their cable systems are the natural first look.
Rogue Fitness doesn’t specialize in cable systems the same way, but their Monster series racks are compatible with several third-party cable attachments, and the Monster Lat Pulldown is a reliable option for those with Rogue infrastructure.
Force USA builds integrated all-in-one systems — rack plus functional trainer — that are worth considering if you’re starting from scratch and want everything in one purchase. Their G3, G6, and G12 models represent different tiers of that concept.
Related post: Best Power Rack for Home Gyms in 2026
The Trade-offs You Should Know Before You Buy
Honesty is part of making a good decision. A power rack cable attachment adds real capability — and real complications.
Cost is the obvious one. A quality cable attachment runs $300–$800 for a bolt-on system; integrated functional trainers start around $1,000 and climb steeply. That’s a meaningful investment on top of what you’ve already spent.
Rack access limitations are real. Some cable attachments — particularly those that mount to the rear uprights — reduce your ability to use the rack’s full depth for barbell work. Depending on the design, you may find that certain pull patterns conflict with where you’d naturally position yourself for squats or bench press.
Maintenance is something most buyers don’t think about until a cable frays or a pulley starts binding. Cables stretch over time and need periodic tensioning or replacement. Pulleys need occasional lubrication. This isn’t onerous maintenance, but it’s not zero either.
Learning curve for cable movements is real if you’re coming from a purely free-weight background. Cable tension feels different, the stability demands change, and dialing in positions and weights takes some experimentation.
Takeaway: Budget for the cable attachment and $50–$100 in accessories (extra handles, ankle strap) at purchase. Having the full attachment set from day one means you won’t be ordering again in a month.
The Right Environment Is the Foundation of the Right Results
A home gym is not a substitute for a commercial gym. For the people who build them intentionally, it’s better — because every session happens on your schedule, in your space, without interruption, without waiting, without the friction that kills consistency.
A power rack with cable attachment — and the full library of power rack cable attachment exercises it enables — is what makes that home gym genuinely complete. It closes the gap between what free weights can do and what your programming actually needs. A whole new dimension to the PPL becomes viable. It makes isolation work possible. It makes constant-tension training — the kind that actually drives hypertrophy — accessible in your own four walls.
More than the exercises it unlocks, it’s what it represents: an environment built to match your ambition. Not a compromise. Not a “good enough for now” setup. A training space that can take you as far as you’re willing to go.


Leave a Reply