
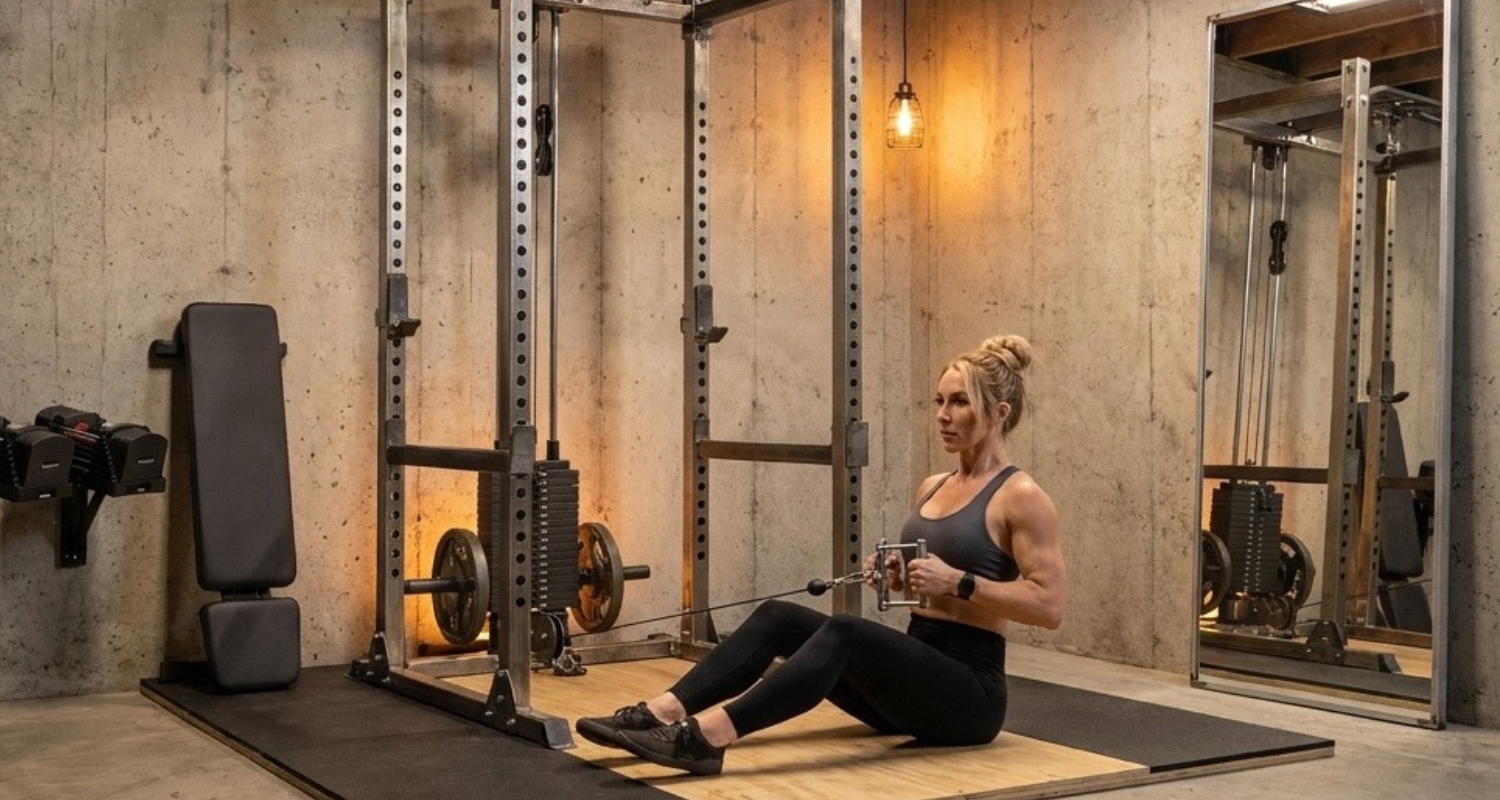
Let’s be honest: most basements aren’t exactly inspiring.
They’re where old furniture goes to retire. Where Christmas decorations spend eleven months of the year. Where unfinished projects, storage bins, and that exercise bike nobody uses somehow end up sharing the same corner.
And if your basement is unfinished? Well, you’ve probably got exposed concrete walls, ceiling joists, pipes, and a floor that looks like it hasn’t changed since the house was built. But here’s the thing:
That’s exactly what makes it a great candidate for an industrial loft basement gym.
Think about it. People spend thousands of dollars recreating the raw, warehouse-inspired look of exposed concrete, visible steel, and unfinished ceilings. Meanwhile, your basement might already have all three.
The Industrial Loft aesthetic isn’t about covering those features up. It’s about embracing them and building a serious training space around what’s already there. Raw concrete walls become the backdrop for your power rack. Exposed ceiling joists give the room its industrial character. Dark rubber flooring, matte-black equipment, and warm lighting turn an ordinary basement into something that feels like a private underground training facility.
And unlike a garage gym, there’s no open door leading to the driveway. No natural light spilling in when you lift the door. You’re working with a fully enclosed space, which brings its own advantages and challenges. Lighting matters more. Moisture control becomes essential. Ceiling height can make or break your equipment choices.
Get those details right, though, and an industrial loft basement gym can become one of the most distinctive training spaces in your home.
Let’s talk about how to build one.
What Separates the Industrial Loft Basement Gym?
At first glance, the Industrial Loft and Athlete Cave might seem like two versions of the same idea. Both are rugged. Both work well in basements. And neither is trying to recreate the bright, polished atmosphere of a luxury fitness club. But there’s a pretty important difference:
The Athlete Cave creates its atmosphere. The Industrial Loft reveals it.
In an Athlete Cave, you might paint the walls charcoal or near-black, install dramatic directional lighting, and build an environment that feels completely separate from the rest of the house. The Industrial Loft takes almost the opposite approach. Instead of hiding the basement’s original structure, it makes that structure part of the design. The concrete stays concrete. The ceiling joists remain visible. The room’s raw materials become its defining features.
And in a basement, those features are especially interesting.
1. You’re Training Inside the Actual Structure of the House
There’s something pretty cool about an unfinished basement. Those concrete walls aren’t decorative panels designed to look industrial. They’re part of the building’s foundation. The exposed joists overhead aren’t there to create an architectural effect. They’re supporting the floor above you. And that concrete slab beneath your feet? That’s the real deal, too.
An industrial loft basement gym uses these structural elements as its visual foundation. A raw-steel power rack against an exposed concrete wall looks natural because both materials share the same rugged, utilitarian character. You don’t need to manufacture an industrial appearance when the room already has one.
2. The Basement Creates Its Own Atmosphere
There’s a different feeling that comes with walking downstairs into a dedicated training space. You’re physically separating yourself from the rest of the house. No television in the next room. No kitchen calling your name. Just your equipment, your workout, and a space that’s been set aside for training. That sense of separation is part of the appeal.
The Industrial Loft takes advantage of it without needing to make the room artificially dark or theatrical. The raw concrete, exposed structure, and warm directional lighting already give the space plenty of personality.
3. The Space Gets Better With Use
One thing I love about the Industrial Loft is that it doesn’t have to look pristine forever. A little chalk residue on a dark walnut shelf? That’s character. A raw-steel barbell developing a working patina? That fits the room. Minor cosmetic scuffs on the platform after months of training? Those tell a story.
The Industrial Loft is supposed to feel like a working training environment. Of course, there’s a difference between character and damage. Rust, water intrusion, and deteriorating concrete aren’t design features. But the normal cosmetic signs of consistent training don’t have to be hidden. In fact, they can make the space feel even more authentic.
Related Post: Industrial Loft Garage Gym: Aesthetic Design and Setup
Related Post: The Athlete Cave Basement Gym: Design, Setup, and Training Guides
Industrial Loft Basement Gym Setup: Walls, Ceiling, Flooring, Lighting, and Storage
Before you start shopping for equipment, take a good look at the room itself. Building an industrial loft basement gym is a little different from setting up a spare bedroom or garage. You’re working below ground, which means moisture, ceiling clearance, and lighting deserve extra attention.
And because basements often have exposed structural elements, there are opportunities to make the room look incredible without an expensive renovation. The key is knowing what to preserve, what to improve, and what needs to be addressed before you start lifting.
Wall Treatment: Let the Concrete Speak for Itself
If your basement has exposed poured-concrete or concrete-block walls, you’ve already got one of the most important design features. Don’t be too quick to paint over them. The natural grey tones, subtle surface variations, and rough texture of concrete are exactly what give the Industrial Loft its character. Instead, start by cleaning the walls.
Over the years, basement walls can accumulate dust, grime, stains, and other residue that make them look dull. A concrete-safe cleaning product and a thorough scrub can make a surprising difference. Once the walls are clean and dry, consider a suitable clear penetrating concrete sealer.
The goal is to protect the surface while preserving its natural appearance. Unlike an opaque coating, an appropriate clear sealer can help maintain the look of exposed concrete.
Choosing the Right Sealer
Basements are different from above-ground rooms because moisture can move through the surrounding foundation. That’s why you shouldn’t grab the first concrete coating you see at the hardware store. The original design approach calls for penetrating sealers, including suitable silicate-based or penetrating epoxy products, rather than ordinary surface coatings that can peel or flake under unfavorable conditions. But the right product depends on the condition of your concrete and whether moisture is entering through it.
A sealer isn’t a substitute for waterproofing or repairing an active moisture problem. Handle that first.
What If Your Basement Walls Are Already Painted?
If you’re committed to the raw-concrete appearance, removing existing paint may be an option. Depending on the coating, this could involve an appropriate chemical stripper or professional mechanical removal. But don’t assume stripping is always worth the trouble.
Older coatings may contain hazardous materials, and aggressive grinding can damage concrete or create harmful dust. If the existing wall is sound, painting it a warm charcoal grey may be the more practical compromise. You won’t get the exact texture of raw concrete, but you can still create a strong industrial backdrop.
The Industrial Loft rule: Preserve genuine concrete where it’s practical and safe. Don’t create a bigger problem just to achieve a particular look.
Ceiling Treatment: Keep It Exposed, But Make It Intentional
The ceiling is one of the biggest opportunities in an industrial loft basement gym. It’s also one of the easiest places for the design to go wrong. Exposed joists, pipes, ducts, and wiring can give a basement plenty of character. But when everything is a different color, the ceiling can look cluttered rather than industrial.
One approach is to paint the exposed ceiling structure a consistent dark grey or matte black. That creates a unified appearance while allowing the joists and other structural elements to remain visible. The ceiling visually recedes, making the room feel more deliberate and helping the equipment stand out. A properly planned spray finish can work well for this effect.
However, don’t spray over electrical components, insulation, labels, fire-safety equipment, or mechanical systems indiscriminately. Some elements need to remain accessible, visible, or untreated. The goal is a cohesive industrial ceiling, not covering everything in black paint regardless of function.
Measure Your Ceiling Height Before Buying Anything
Here’s where basement gyms can get tricky. That beautiful power rack you’ve been eyeing? It might not fit. And even if the rack itself fits, you may not have enough room to perform certain exercises comfortably. Before purchasing equipment, measure the height from the floor to the lowest obstruction. That includes:
- Ceiling joists
- HVAC ducts
- Exposed pipes
- Beams
- Other mechanical components
Measure at the exact location where the equipment will sit, not just in the middle of the room. A basement with an eight-foot ceiling may accommodate a compact residential rack, but you’ll still need to account for pull-ups, overhead presses, and other movements requiring vertical clearance. The same goes for plyometric exercises and gymnastics rings.
Don’t buy a rack based on ceiling height alone. Buy it based on the space you actually have to move.
Flooring: Concrete Character With Practical Protection

Concrete flooring is another feature that works naturally with the Industrial Loft aesthetic. But just because it looks right doesn’t mean you should train directly on it. Heavy weights, floor exercises, and repeated impacts call for a more forgiving and protective surface. For most industrial loft basement gym setups, I recommend combining sealed concrete with dark rubber flooring in the main training zone.
You preserve the original material around the edges while giving yourself a more practical surface for lifting.
Check for Moisture Before Installing Flooring
Before laying down rubber mats or applying a sealer, make sure the floor doesn’t have an active moisture problem. A simple preliminary check is the plastic-sheet test.
Tape a roughly twelve-inch square of clear plastic tightly to the concrete, sealing the edges, and leave it in place for about twenty-four hours. If moisture collects beneath the plastic or the concrete visibly darkens, that may indicate moisture moving through the slab. It’s not a definitive moisture assessment, but it’s a useful warning sign. If you suspect a problem, investigate it before covering the floor.
Rubber mats and certain coatings can trap moisture, which may lead to unpleasant odors, deterioration, or other issues. Once the floor is dry and any underlying problems have been addressed, you can move forward.
THE INDUSTRIAL LOFT BASEMENT FLOOR — WHERE TO START
There are three configurations worth considering.
Option 1: Sealed Concrete, Rubber Training Zone, and Raw Plywood Platform
This is the most complete version of the Industrial Loft flooring approach. Start with a suitable clear penetrating sealer on the exposed concrete. Install dark charcoal horse stall mats in the primary training zone. Then add a properly constructed raw plywood lifting platform where your main barbell work will take place.
The exposed concrete around the mat perimeter preserves the room’s industrial character, while the platform creates a dedicated lifting area. It’s practical, visually cohesive, and particularly appealing for strength training.

HIIARO Horse Stall Mats

Option 2: Full Horse Stall Mat Coverage With a Raw Plywood Platform
If your basement floor isn’t particularly attractive, or you’d rather cover more of it, full rubber coverage is another option. Dark charcoal mats can create a consistent training surface throughout the room. A plywood platform in the center still introduces that raw construction-material look.
This setup can be especially useful when you need more protected floor space, although rubber mats and platforms alone won’t eliminate impact noise or vibration.

Option 3: Interlocking Rubber Tiles With a Concrete Perimeter
Want a cleaner boundary around your training zone? Dark interlocking rubber tiles are worth considering. They allow you to define the workout area while leaving a visible border of sealed concrete. This gives the room a slightly more organized appearance without losing the raw industrial feel.
Just make sure the tiles are appropriately rated for the loads and activities you plan to use them for.

Lighting: The Most Important Design Decision in an Industrial Loft Basement Gym
Let’s talk about the one thing that can make an otherwise great basement gym feel completely uninspiring. Bad lighting.
Unlike a garage, your basement may have little or no natural light.
That means your artificial lighting has to do everything. It needs to illuminate your equipment, make the room comfortable to train in, and bring out the character of those exposed concrete walls. One harsh ceiling fixture probably isn’t going to accomplish all three. The best approach is a layered lighting system.
Layer 1: Matte-Black LED Shop Lights
These are the workhorses of your lighting setup. In an industrial loft basement gym, your primary lights should provide enough illumination for safe lifting, equipment adjustments, and movement around the room. Matte-black LED shop lights mounted to suitable ceiling supports are a great option. Their rectangular housings fit naturally with the exposed structure, and adjustable fixtures let you direct light toward the areas that need it most. For example:
- One light focused on the power rack
- One aimed at the lifting platform
- A third illuminating the conditioning area, if needed
Warm-white lighting around 3000K is a strong starting point. It’s bright enough to support a practical training environment when the fixtures are properly sized, while still complementing the warmer industrial atmosphere.
The actual number of lights depends on your basement’s size, layout, and the fixtures’ output. And unlike recessed fixtures hidden behind a finished ceiling, visible shop lights can actually contribute to the industrial design.

Layer 2: Warm Amber LED Wall Wash
This is where things get interesting. If you want your exposed concrete walls to become a real design feature, try installing warm amber LED strips near the baseboards.
Aim the light upward across the wall. The result can be dramatic.
Instead of seeing a flat grey surface, you’ll notice the subtle texture of the concrete, the variations in its finish, and the mortar lines between concrete blocks. The lighting gives the walls depth. It’s especially effective in basements because there’s little natural light competing with the effect.
Look for warm amber lighting around 2200K–2700K.
That warmer tone helps prevent the room from feeling cold or institutional. Combined with the overhead shop lights, it creates a layered atmosphere that feels rugged without being gloomy.

Layer 3: Recessed Spotlights for Finished Ceilings
What if your basement already has a finished ceiling? You can still achieve the Industrial Loft look. Low-profile recessed LED spotlights with matte-black trim are a good alternative to exposed shop lights.
They blend into a dark ceiling and provide focused illumination over the main training areas. Just remember that recessed fixtures need sufficient ceiling clearance and an installation compatible with the existing structure and electrical requirements.

Optional: Industrial Cage Pendant Lights
If your ceiling height allows, industrial cage pendants can add another layer of personality. The exposed bulbs and matte-black wire cages look fantastic against concrete and dark ceiling joists. They also provide a warm glow that softens the harder materials in the room. But I wouldn’t rely on them as your only light source.
They’re best used as atmospheric accents alongside your main functional lighting. And in a basement with limited headroom, skipping pendants may be the smarter choice.

Moisture and Humidity: Don’t Let the Basement Win
Here’s something that separates a basement gym from almost every other home gym setup. Moisture. You can have the perfect rack, beautiful lighting, and an incredible exposed-concrete backdrop. But if your basement is damp, none of that will matter for long.
Moisture can damage equipment, create unpleasant odors, and contribute to mold problems. And in an Industrial Loft, where exposed concrete is a major part of the design, those issues can become especially noticeable.
Invest in a Dehumidifier
A dehumidifier is one of the most practical investments you can make for a basement gym. Aim to keep relative humidity below about 50%, while avoiding excessively dry conditions. A 50-pint dehumidifier may be suitable for many basement spaces, although the correct capacity depends on the room’s size, temperature, and moisture load. If possible, choose a model that supports continuous drainage. That way, you won’t have to remember to empty the collection tank every day.

Watch for Efflorescence
Ever noticed a white, powdery or crystalline substance appearing on concrete or masonry walls? That’s often efflorescence. It occurs when moisture moves through masonry and leaves soluble salts behind as the water evaporates. In an industrial loft basement gym, it can make otherwise attractive concrete walls look neglected. More importantly, it may signal an underlying moisture problem.
A dehumidifier helps control moisture in the air, but it won’t necessarily stop water entering through the foundation. If efflorescence keeps returning, address the moisture source rather than simply cleaning the wall and sealing over it.
Protect Your Raw-Steel Equipment
Raw steel looks fantastic in an Industrial Loft. Unfortunately, it also requires more maintenance than many coated finishes. In a humid basement, bare steel can develop rust relatively quickly.
Regularly inspect your barbells, rack components, and other exposed steel surfaces.
For appropriate bare-steel parts, a light application of 3-in-One oil or mineral oil can help prevent corrosion. Follow the equipment manufacturer’s maintenance recommendations, particularly around knurling, moving parts, and coated surfaces. A monthly inspection is a useful habit, with cleaning and oiling as needed. A little working patina is one thing. Rust eating into your equipment is another.
Related Post: Home Gym Lighting Ideas: How Light Transforms a Training Space
Storage: Keep It Rugged and Organized
The Industrial Loft looks best when everything has a purpose. That doesn’t mean the room needs to be spotless. But equipment should have a designated place rather than accumulating in random corners.
Dark Walnut Shelving
Rough-cut lumber stained dark walnut and mounted on heavy matte-black steel brackets is a natural fit. Against exposed concrete, it creates the kind of rugged contrast that defines the aesthetic. You can use these shelves for chalk, smaller accessories, training journals, and other frequently used items.
If you’re storing heavy kettlebells, pay close attention to load capacity. Concrete walls require appropriately specified masonry anchors, and the shelf brackets must be rated for the combined weight of the equipment. Don’t assume ordinary household shelving hardware will be sufficient.
Plate Storage
A matte-black plate tree positioned near the rack keeps your plates organized and easy to access. It’s compact, practical, and fits the room’s finish palette.
Pegboard and Barbell Storage
A smaller matte-black pegboard can handle resistance bands, straps, collars, and other accessories. Wall-mounted steel barbell J-hooks are another useful option for storing a secondary barbell. When mounting hardware to concrete or concrete block, use anchors appropriate for the substrate and expected loads. The result is a space where everything is visible, accessible, and ready for the next session.
Related Post: Home Gym Storage Ideas: How to Organize Any Space for Serious Training
Three Industrial Loft Basement Gym Mistakes to Avoid
Even with the right equipment and materials, a few common mistakes can undermine the finished result.
Mistake 1: Covering Up the Concrete
If your basement has attractive, sound concrete walls, don’t assume they need to be painted. The natural texture is one of the strongest features of this aesthetic. Cleaning and preserving the surface may give you a more distinctive result than another coat of grey paint.
That said, preserving raw concrete should never come at the expense of necessary moisture repairs or wall protection.
Mistake 2: Ignoring Moisture Until Something Rusts
This one can get expensive. A damp basement can damage raw-steel equipment, create odors beneath flooring, and contribute to deterioration of the concrete surfaces you’re trying to showcase.
Don’t wait until your barbell starts rusting or white deposits appear on the walls. Check for moisture problems, address water intrusion, and establish humidity control before the gym is fully operational.
Mistake 3: Leaving the Room Too Dark
There’s a difference between industrial atmosphere and poor visibility. A dim basement with exposed concrete isn’t automatically a beautiful gym. You need lighting that reveals the room’s texture while giving you enough illumination to train safely. Combine practical overhead lights with warm accent lighting.
That balance is what makes the space feel intentionally designed rather than simply unfinished.
Related Post: Home Gym Layout Mistakes (and How to Fix Them)
Training Setup 1: Barbell Strength and Powerlifting
For lifters who want a dedicated space for heavy squats, presses, deadlifts, and serious strength training.

If your training revolves around a barbell, the Industrial Loft basement is a fantastic setting. There’s something fitting about heavy iron, raw steel, and exposed concrete sharing the same room.
And because the basement is separated from the rest of the house, you may have more freedom to train without disturbing nearby rooms. But don’t mistake that separation for complete soundproofing. Heavy lifts and dropped weights can still transmit vibration through the building’s structure.
You’ll want appropriate flooring, a properly constructed platform, and consideration for anyone living above.
Choose a Compact Power Rack
A raw-steel or matte-black power rack is the centerpiece. In a basement, compact residential models are often the best starting point because of ceiling-height limitations. Measure carefully before purchasing. You need enough room not only for the rack itself, but also for the movements you’ll perform inside it.
A raw-steel finish pairs beautifully with exposed concrete, although it will require regular maintenance in a basement environment.

Cast-Iron Plates
For traditional powerlifting and controlled barbell training, cast-iron plates are a natural choice. Their dark-grey finish complements the concrete, steel, and plywood materials throughout the room. They also take up less space on a plate tree than many bumper plates of the same weight.
If you’re performing controlled squats, presses, and deadlifts, iron plates make plenty of sense. For movements involving repeated drops, use equipment and flooring specifically designed for that purpose.

Finish the Setup
Add a sturdy bench, a dedicated lifting platform, and nearby storage for chalk and accessories. The dark walnut shelf above your storage area might collect a little chalk dust over time. That’s fine. A working gym should look like somebody trains there. Just keep the equipment and surfaces properly maintained.
Related Post: Best Power Rack for Home Gyms in 2026: Trainer-Tested Picks
Training Setup 2: Conditioning and Functional Performance
For athletes who want to develop cardiovascular endurance, explosive power, and functional strength without leaving the basement.

The biggest difference between a garage and basement conditioning setup is obvious. You can’t simply open the garage door and take your workout outside. That means your equipment needs to make the most of the available indoor space. Fortunately, you don’t need a huge collection of machines to build an effective conditioning setup. A few versatile pieces can go a long way.
Assault Bike
An assault-style air bike is an excellent conditioning anchor. It’s compact, versatile, and capable of delivering everything from steady aerobic work to brutal sprint intervals. A dark matte finish also fits the Industrial Loft aesthetic perfectly. Basements may offer some acoustic separation, but air bikes can still generate considerable noise and vibration. Keep that in mind if people occupy the rooms above.

Cast-Iron Kettlebells
Cast-iron kettlebells are practically made for this aesthetic. They’re simple, rugged, and incredibly versatile. Use them for swings, cleans, carries, presses, and conditioning complexes. And when they’re arranged neatly on a dark walnut shelf, they become one of the most visually appealing details in the room.

Battle Ropes
Battle ropes add another conditioning option, particularly for upper-body endurance. Choose dark-grey or black ropes to complement the room. Anchor them to a properly rated rack base or dedicated attachment point, and make sure you have enough clear floor space to use them safely.

Raw Plywood Plyo Box
A raw plywood plyo box looks completely at home in an Industrial Loft. It has that practical, workshop-built appearance that works so well with concrete and steel. But here’s the catch. Basement ceilings can make jumping exercises tricky.
Before incorporating box jumps, check the clearance above your head at the top of the movement. If space is limited, step-ups may be a more practical alternative.

Landmine Attachment
A landmine attachment is another excellent option for compact basement gyms. It supports rotational exercises, unilateral presses, rows, and other compound movements without requiring a large machine. And because it can attach to a suitable rack or floor mount, it doesn’t consume much permanent space.

Training Setup 3: Bodybuilding and Hypertrophy
For lifters who want to build muscle, improve their physique, and create a private training space with plenty of character.

If you’re building a bodybuilding-focused gym, the basement has one major advantage. Privacy. You can close the door, put on your music, and focus on your workout without the distractions of a busy commercial gym.
That kind of environment can be especially appealing during longer hypertrophy sessions with plenty of accessory work. And the Industrial Loft aesthetic gives the room a much more distinctive personality than a typical home workout space.
The Mirror Makes a Difference
A mirror is useful for checking certain aspects of your form, but it can also become a major design feature. For an industrial loft basement gym, consider a full-length mirror with a slim raw-steel or matte-black frame.
Mount it against an exposed concrete wall. The contrast between smooth reflective glass and rough concrete can look fantastic. I’d position it on a wall perpendicular to the power rack rather than directly behind it. That allows the raw concrete to remain the backdrop for your main compound lifts while still giving you a useful mirror for dumbbell and cable exercises.
And with warm amber lighting reflecting off the surrounding walls, the room can have a surprisingly dramatic appearance.

Power Rack With Cable Attachment
For hypertrophy training, a power rack with an integrated cable system is one of the most useful investments you can make. It allows you to perform movements such as:
- Lat pulldowns
- Cable rows
- Face pulls
- Cable flyes
- Triceps pushdowns
You get the versatility of a cable machine without necessarily dedicating a separate section of the basement to one. Choose a raw-steel or matte-black finish to maintain the Industrial Loft’s material palette.

Adjustable Dumbbells and Bench
Adjustable dumbbells are another excellent space-saving option. Choose a dark matte finish if possible. Pair them with an adjustable bench featuring dark upholstery and a matte-black frame. Store resistance bands, collars, and smaller accessories on the nearby pegboard.
The goal is to create a training environment that supports plenty of exercise variety without making the room feel overcrowded.
Training Setup 4: Functional Fitness and CrossFit-Style Training
For athletes who enjoy combining barbell movements, gymnastics, conditioning, and functional strength work.

The Industrial Loft aesthetic and functional fitness have a natural connection. Both emphasize practical equipment, rugged materials, and spaces designed around movement rather than decoration. And while a basement doesn’t offer the outdoor access of a garage, it can still support a wide range of functional fitness workouts. You just need to adapt the programming to the room.
Replace Outdoor Conditioning With Indoor Alternatives
In a garage gym, you might open the door and head into the driveway for sprints or loaded carries. In a basement, you’ll need other options. Assault bike intervals can replace some running-based conditioning pieces.
Short carries or stationary loaded-hold variations can substitute for longer farmer’s walks when space is limited. You can also use kettlebell complexes, barbell cycling, and other movements that work within a compact footprint. The goal isn’t to recreate every outdoor exercise exactly. It’s to achieve a similar training effect using the space you have.
Wooden Gymnastics Rings
Wooden gymnastics rings can be a fantastic addition to a functional fitness setup. Their natural wood grain creates a striking contrast against dark ceiling joists and raw concrete.
They also support a variety of exercises, including rows, dips, and other gymnastics movements. But mounting them in a basement requires careful planning.
Exposed joists aren’t automatically suitable for supporting dynamic gymnastics loads. Confirm that the structure and attachment hardware are properly rated before installing rings. And make sure you have enough ceiling clearance for the movements you intend to perform.

Folding Wall-Mounted Squat Rack
If your basement is relatively small, a folding wall-mounted rack can be a smart alternative to a full cage. It provides a dedicated station for barbell work while allowing you to reclaim floor space for conditioning and gymnastics movements. When mounting a rack to concrete or concrete block, use the anchor hardware specified by the manufacturer.
Concrete block in particular requires careful attention to anchor type, substrate condition, and load ratings. A wall-mounted rack experiences significant forces during training, so this isn’t a place to improvise.

Complete the Setup
For the rest of the equipment, stick with the same functional, industrial palette. Use iron or black bumper plates depending on your lifting style. Add cast-iron kettlebells for swings, cleans, and carries. Keep a dark matte assault bike nearby for conditioning.
And if your ceiling height permits, a speed jump rope can round out the setup. It’s a straightforward collection of tools that supports a wide range of training without sacrificing the room’s industrial character.
Underground and Uncompromising
There’s something satisfying about taking the most overlooked room in the house and turning it into one of the most purposeful. The basement that used to hold forgotten furniture and dusty storage bins now has a power rack against the concrete wall.
The exposed ceiling joists that once made the room feel unfinished are part of the design. The floor has a dedicated lifting platform, the equipment has its place, and warm amber lighting brings out the character of materials that have been there all along. You haven’t tried to make the basement look like a commercial gym. You’ve created something different.
Something that feels personal, rugged, and genuinely suited to the space. And that’s what makes an industrial loft basement gym so appealing. It’s not about spending money to make ordinary materials look industrial. It’s about recognizing that concrete, steel, wood, and exposed structure already have a character worth celebrating.
Add the right equipment, thoughtful lighting, practical storage, and proper moisture management, and you’ve got a training environment that can serve you for years.
Sometimes building your Iron Paradise doesn’t mean changing everything. It means finally seeing the potential in what’s already there.
If you’re still exploring the five home gym aesthetics and deciding which design philosophy fits your space and training style, the free SOMA Dream Gym Style Guide walks you through all of them—with mood boards, equipment guides, and a framework for creating a gym that reflects who you are.



Leave a Reply