Setting up a home gym is exciting. You carve out a corner of the garage, a spare bedroom, or a finished basement, order a few key pieces of equipment, and suddenly you have a dedicated training space that is entirely yours. No waiting for a machine. No commute. Zero strangers hogging the squat rack.
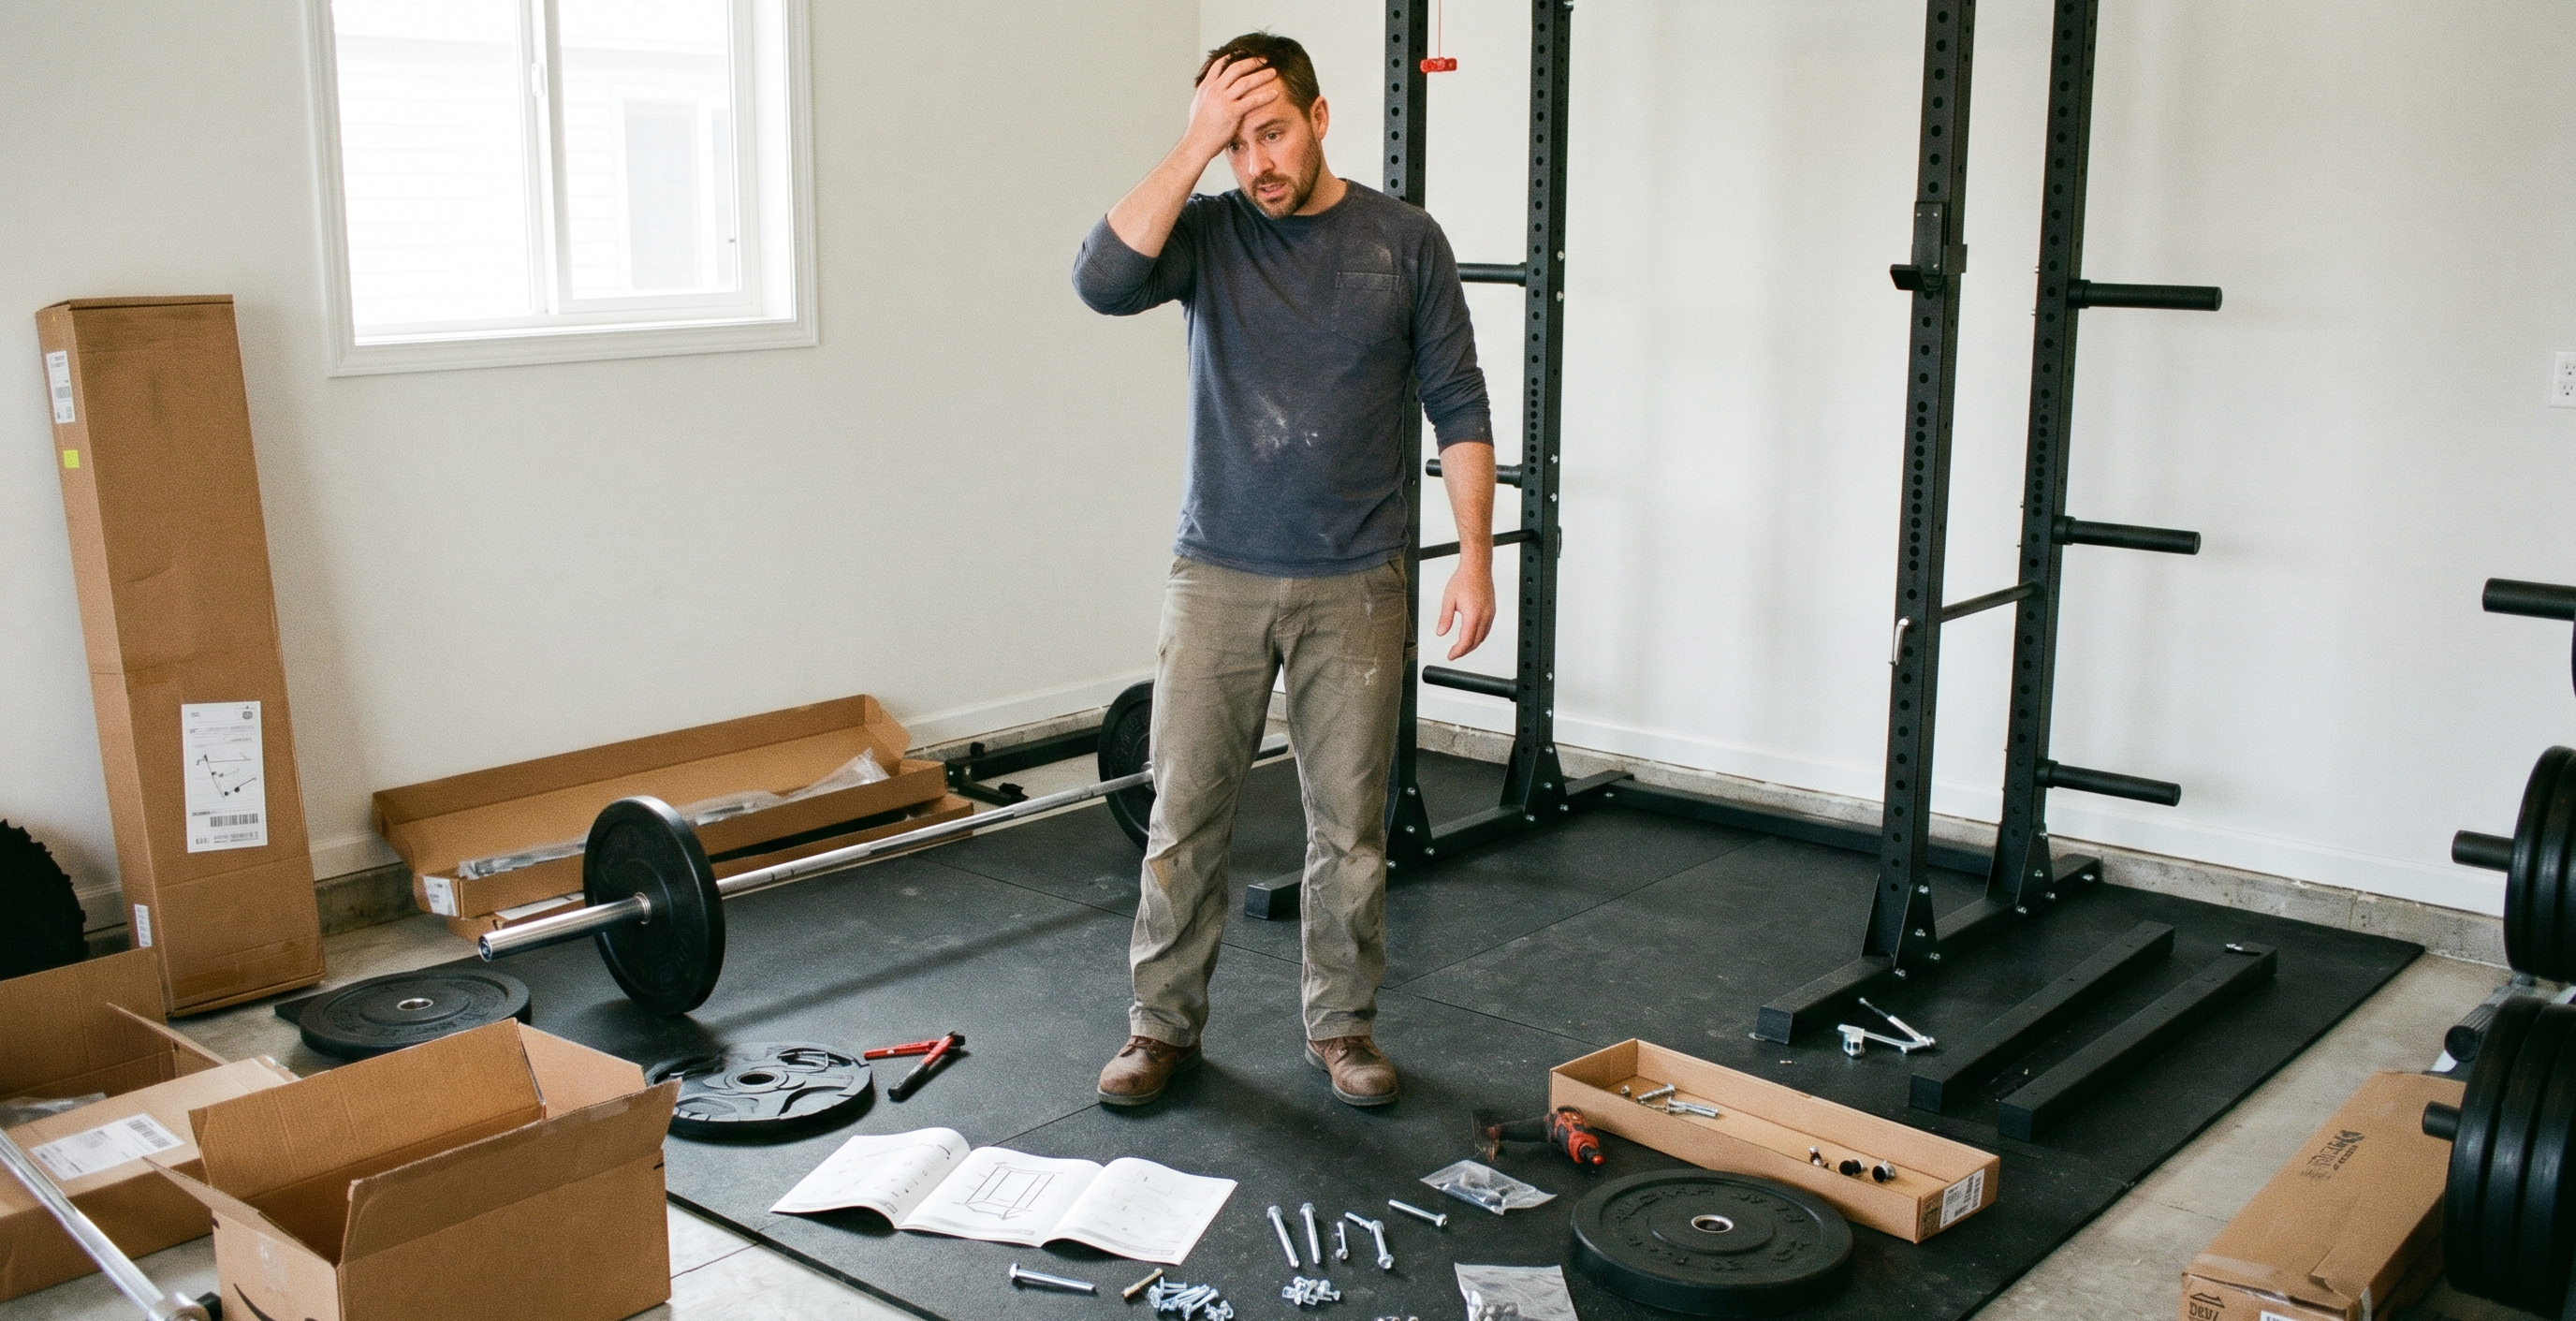
But somewhere between the excitement of the first purchase and the reality of daily training sessions, many home gym owners run headfirst into a problem they never anticipated: the space stops working. Equipment piles up in the wrong places. The floor becomes a minefield of plates, bands, and cables. Finding a single pair of lifting straps before a workout turns into a five-minute scavenger hunt.
The culprit is almost never the equipment itself. It is the small home gym organization mistakes made along the way — decisions that seemed harmless at the time but compound quickly in a confined space. The good news is that every single one of these mistakes is fixable, and most of them are preventable entirely if you know what to look for.
This guide walks through the most common small home gym organization mistakes in detail: what causes them, why they matter more than most people realize, and the specific steps you can take to correct them and reclaim your training space.
Mistake #1: Buying Equipment Before Planning Storage
This is the original sin of home gym organization, and it sets off a chain reaction that affects every other area of the space.
The typical story goes like this: someone sees a deal on a barbell set, grabs it without thinking about where the plates will live. A few weeks later they add a set of adjustable dumbbells, which get set on the floor because there is no rack. Then comes a pull-up bar, a resistance band set, a jump rope, a foam roller, and a pair of gymnastics rings. Within a few months, the floor is littered with gear and the space feels chaotic even on days when nothing has been used.
The problem is a fundamental mismatch between equipment volume and storage infrastructure. When you buy equipment first and plan storage second (or never), you are always playing catch-up. Every new piece of gear creates a new organization problem, and those problems stack up faster than you expect.
A Strategic Approach
The fix starts with a floor plan — even a rough sketch on paper. Before purchasing anything, ask yourself three questions:
- Where will this specific piece of equipment live permanently?
- What storage solution does it require (rack, hook, shelf, bin)?
- How will I access it without moving three other things out of the way?
Professional gym designers think about traffic flow, zone separation (cardio vs. lifting vs. stretching), and storage-to-equipment ratios before a single piece of gear enters the space. You do not need a professional to apply the same logic. Measuring your walls, sketching equipment footprints to scale, and researching storage options before buying anything will save you enormous frustration downstream.
A useful rule of thumb: for every major piece of equipment you purchase, budget time and money for a dedicated storage solution. A barbell needs a barbell holder or rack. A plate set needs a plate tree or peg system. Resistance bands need a hook bar or pegboard panel. Think of storage as a non-negotiable part of every equipment purchase, not an afterthought.
Mistake #2: No Vertical Storage — Wasted Wall Space
Walk into most disorganized home gyms and you will notice the walls are nearly bare. Everything is piled on the floor, stacked against the baseboards, or jammed into corners at ground level. The walls — which represent some of the most valuable real estate in any small training space — sit completely unused.
This is one of the most impactful small home gym organization mistakes to fix because the vertical dimension of a room is almost always underutilized. A standard 8-foot ceiling gives you 96 inches of vertical space. Most people use less than 24 inches of it for storage. The other 72 inches are just air.
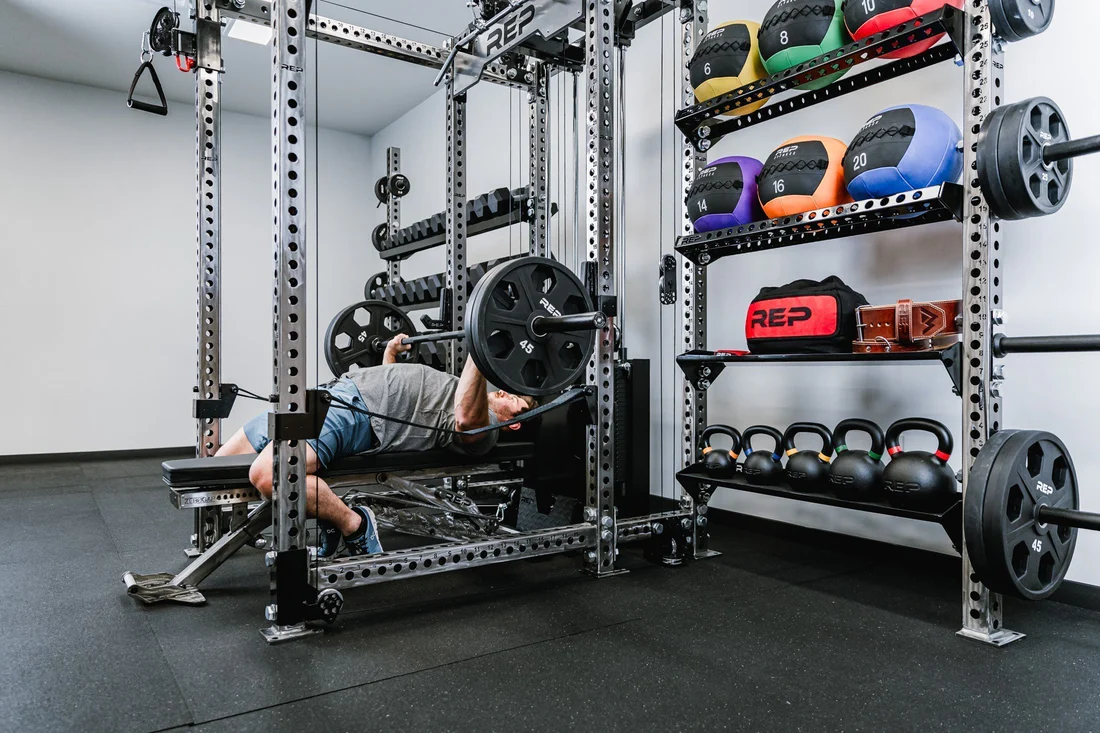
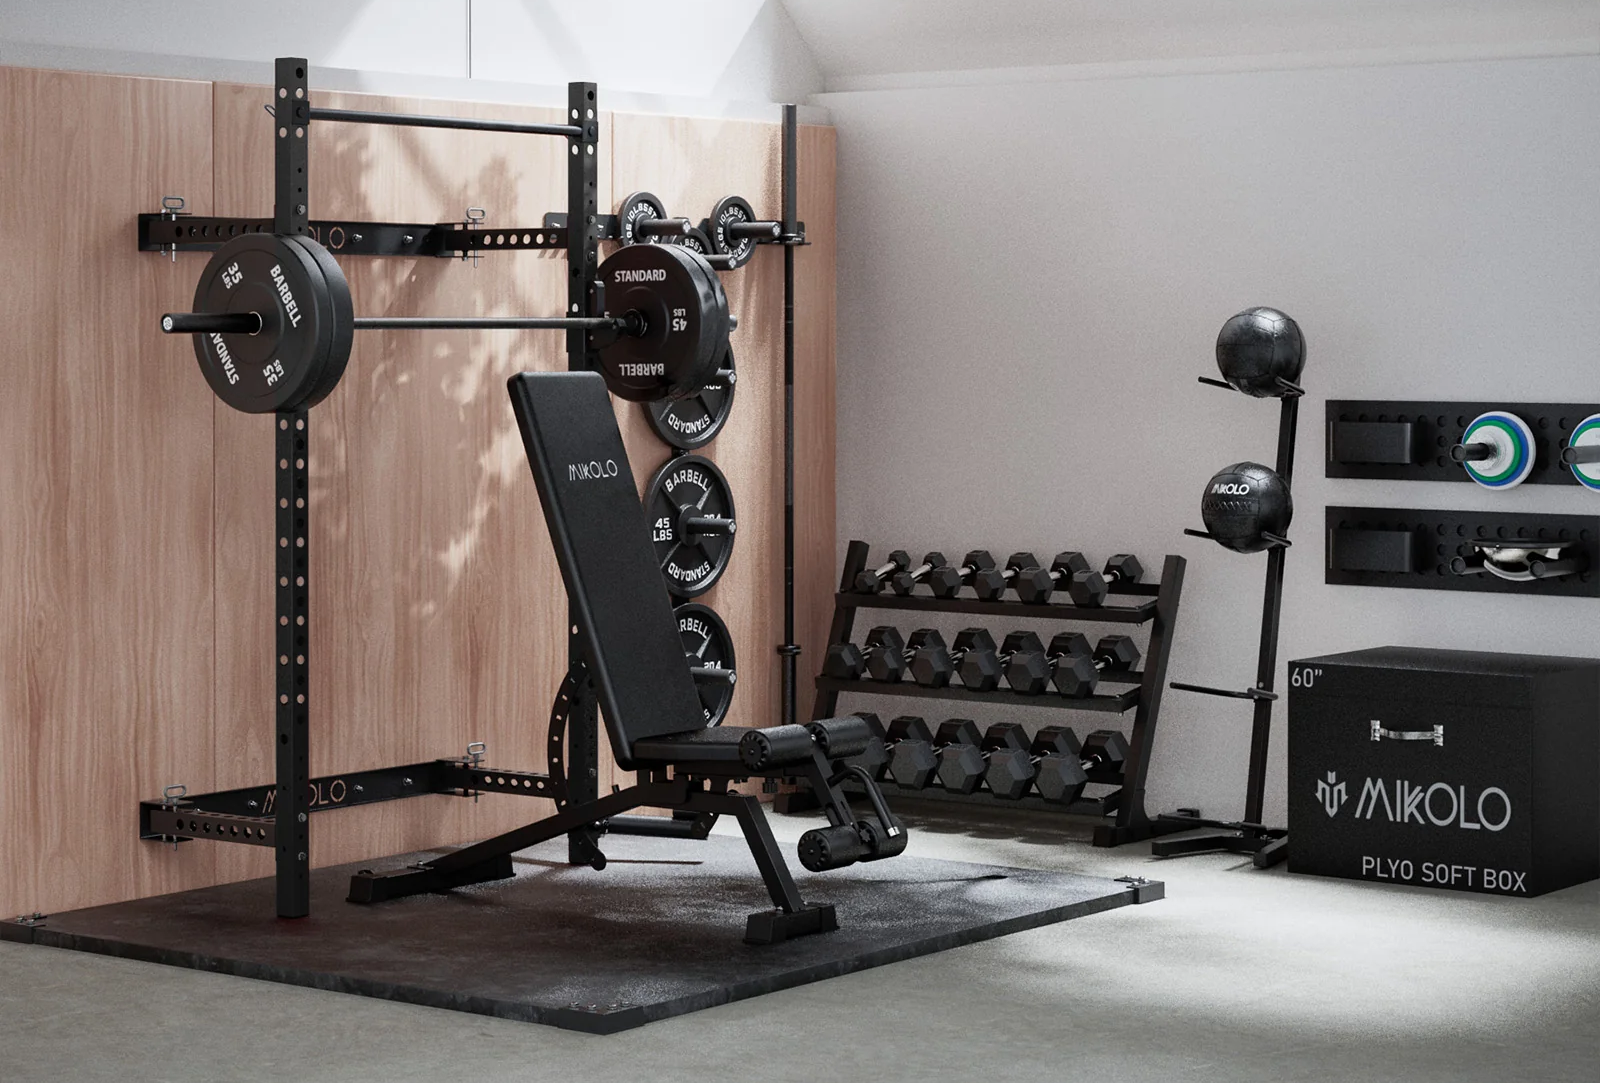
Vertical storage is particularly powerful in home gyms because most of the equipment is either flat, linear, or cylindrical — shapes that are perfectly suited to wall-mounted solutions. Plates, barbells, dumbbells, bands, jump ropes, battle ropes, foam rollers, medicine balls: all of these store beautifully on walls when you have the right systems in place.
The most versatile vertical storage solution for home gyms is a pegboard system. A 4×8 sheet of pegboard mounted on a wall can hold dozens of accessories — bands, collars, chalk, straps, gloves, jump ropes, ab wheels — in an organized, visible, and easily accessible arrangement. Because pegboard hooks are repositionable, you can reorganize as your equipment collection changes.
Other Vertical Options
Beyond pegboard, consider these vertical storage options:
- Wall-mounted barbell holders: Horizontal pegs that hold barbells parallel to the wall, freeing up enormous floor space that a freestanding rack would otherwise occupy.
- Wall-mounted plate trees: Peg systems that mount directly to studs and hold bumper or iron plates vertically, keeping them organized by weight and off the floor.
- Garage track systems: Adjustable wall track systems (often used in garage organization) allow you to hang bins, hooks, and shelves at any height, creating a fully customizable storage wall.
- Upper shelving: A shelf mounted at 6 to 7 feet holds items that are used less frequently — foam rollers, medicine balls, yoga blocks, extra towels — without consuming any usable floor space.
When planning vertical storage, anchor into wall studs wherever possible. Home gym equipment is dense and heavy; drywall anchors alone are not adequate for holding loaded plate trees or barbell racks. A stud finder, appropriate lag bolts, and a level are essential tools for this project.
Related Article: Best Wall Mounted Home Gym Equipment for Small Spaces
Mistake #3: Clutter on the Floor — Trip Hazards and Lost Space
Floor clutter in a home gym is not just an aesthetic problem. It is a safety problem.
Lifting heavy weight requires a clear, stable environment. Your attention during a deadlift, a squat, or a loaded carry should be entirely on movement quality and body position — not on navigating a floor covered in loose plates, scattered collars, and tangled jump ropes. Obstacles on the floor create real injury risk, especially during movements that involve backward steps, lateral movement, or any kind of fatigue-induced stumble.
Beyond safety, floor clutter is one of the primary reasons small home gyms feel cramped even when they are not. A 300-square-foot garage gym with clear floors feels significantly more spacious than a 400-square-foot gym where equipment covers half the ground. Perception of space is largely determined by what is at eye level and below, which means the floor matters more than most people realize.
Eliminating floor clutter requires a two-part approach. First, every item that currently lives on the floor needs to be audited and assigned a proper home. Ask whether each item can be wall-mounted, rack-mounted, hung, shelved, or stored in a cabinet. If the answer is yes to any of these, it does not belong on the floor.
Floor Zones
Second, you need to establish clear floor zones and protect them. The lifting platform or main training area should be a strict no-storage zone. Equipment only enters that zone when it is actively being used and leaves it immediately after. This sounds obvious but requires habit formation — it is easy to set a plate down on the platform after a set and leave it there, and that single plate quickly becomes five plates, two kettlebells, and a foam roller.
Practical floor-clearing solutions include:
- Rubber flooring with defined zones: Using different colored rubber tiles to visually demarcate the lifting zone from storage areas reinforces the habit of keeping the training area clear.
- Equipment carts with wheels: A small rolling cart can hold accessories and be pushed against the wall when training, then rolled into position during warm-up or accessory work.
- Dedicated end-of-session cleanup routines: Spending three minutes returning all equipment to its designated storage location after every workout prevents the accumulation that creates chronic clutter.
Related Article: How to Organize a Small Home Gym (Solutions that Work)
Mistake #4: No Designated Home for Small Items
Ask any experienced home gym owner what the most annoying daily frustration is, and a large percentage will give the same answer: they can never find their collars, bands, chalk, wrist wraps, or other small accessories when they need them.
Small items are the silent killers of home gym organization. They are numerous, easy to misplace, and create disproportionate frustration relative to their size. A missing collar can delay or cancel an entire training session. A pair of wrist wraps that gets knocked behind a bench can disappear for weeks. A chalk block that ends up on the wrong shelf gets used in the wrong place and creates a mess that spreads further clutter.
The root of this problem is a failure to assign specific homes to small items and enforce those assignments consistently. Every small accessory in your gym needs a designated spot, and that spot needs to be purpose-built for the item — not just “somewhere on the shelf” or “in the bin by the door.”
Effective Strategies for Small-Item Organization:
- Pegboard with labeled hooks: Assign individual hooks or clusters of hooks to specific items. Chalk goes on Hook A. Jump rope goes on Hook B. Wrist wraps hang on Hook C. Label each hook with a small tag or piece of tape so the assignment is always visible.
- Compartmentalized bins: A divided storage bin or small drawer organizer mounted at eye level holds collars, bands, clips, and other loose items in separate compartments so nothing mingles.
- Category-based bags or pouches: A small mesh bag or zip pouch dedicated to each equipment category — one for mobility tools, one for wraps and supports, one for chalk and grip aids — creates portable but organized storage that can be grabbed quickly before a session.
- Magnetic tool strips: Originally designed for kitchen knives or workshop tools, magnetic strips mounted to the wall can hold metal collars, clips, and other small metal accessories where they are instantly visible and grabbable.
The most important principle is visual accessibility. If you cannot see an item from where you stand during a training session, it might as well not exist. Wall-mounted solutions that keep small items visible and at or near arm height dramatically reduce the time spent hunting for gear and dramatically increase the likelihood that items get returned to their proper place after use.
Mistake #5: Poor Plate Storage That Eats Floor Space

Plates are some of the densest, heaviest, and most floor-space-consuming items in any home gym. A modest collection of bumper plates — say, four 45-pound plates, four 25-pound plates, four 10-pound plates, and assorted smaller plates — can easily weigh 300 pounds or more and take up several square feet of floor space if stored haphazardly.
The most common plate storage mistake is keeping plates on the floor, either in a loose stack or on a freestanding plate tree placed in a high-traffic area. Loose stacks on the floor are a tipping hazard, a stubbed-toe magnet, and an organizational nightmare — plates get mixed by weight, the stack becomes unstable as it grows, and accessing a specific plate means digging through the whole pile.
Freestanding plate trees solve some of these problems but introduce new ones. A standard freestanding tree takes up a footprint of roughly two to three square feet on its own, plus additional clearance on all sides for loading and unloading. In a small home gym, that is premium real estate that could be open training space.
Wall-mounted plate storage is the most space-efficient solution for most home gyms. A wall-mounted plate peg system anchored to studs can hold the same volume of plates as a freestanding tree while consuming zero floor space. The plates hang flat against the wall, organized by weight, with nothing on the floor beneath them.
Plate Storage Perspective
When designing plate storage, keep these principles in mind:
- Organize by weight: Heaviest plates should be at a comfortable loading height (roughly hip to chest height for most people) because they are the most frequently moved. Lighter plates can go higher or lower.
- Keep plates close to where they are used: Plate storage should be adjacent to the barbell rack or platform, not on the opposite wall. Carrying loaded plates across a room is inefficient and creates a floor-cluttering temptation to leave them near the rack anyway.
- Separate bumper plates from iron plates: If you use both, store them in distinct zones. Bumpers and iron plates have different diameters and do not stack cleanly together; mixing them creates organizational chaos on even a well-designed plate peg.
- Account for future growth: If you plan to add to your plate collection, design your storage system for at least 50% more capacity than you currently need. Running out of plate storage and having to revamp the system six months later is frustrating and expensive.
Mistake #6: Dumbbells Scattered Instead of Racked
Dumbbells are arguably the most versatile piece of equipment in a home gym, which also makes them the most likely to end up scattered across every available surface. They get set on benches after use, rolled under equipment, left near the door, placed on window ledges, and generally treated as items that can live anywhere because they are small enough to move easily.
This scattered approach creates several problems. Finding a specific weight takes time and involves scanning the whole room. Uneven weight distribution on shelving or benches creates instability. Dumbbells left on the floor are among the most common causes of home gym injuries — a 35-pound dumbbell encountered unexpectedly with a bare foot is no small matter.

Dumbbell Rack Solutions
The solution is a dedicated dumbbell rack, sized appropriately for your collection. Dumbbell racks come in three main configurations:
- Vertical A-frame racks: These hold dumbbells in rows, angled outward for easy grip. They are compact and work well for collections of five to fifteen pairs. A two-tier or three-tier A-frame holds a complete set of dumbbells in roughly six to eight square feet.
- Flat horizontal racks: These lay dumbbells flat in linear rows and are better suited for very heavy dumbbells (50 pounds and up) that are awkward to replace on angled pegs.
- Wall-mounted horizontal pegs: For space-starved gyms, horizontal pegs mounted to the wall at staggered heights can hold dumbbells without any floor footprint. Each pair lives on its own dedicated peg labeled with its weight.
Whatever rack type you choose, establishing a by-weight organization system is essential. Lightest weights on one end, heaviest on the other (or on lower shelves for stability). The organization system only works if it is maintained consistently — replacing dumbbells in the correct slot after every set, not just roughly in the right area.
For home gyms with adjustable dumbbells, storage is simpler but still requires thought. Adjustable dumbbells typically come with a charging or storage base; that base should be placed on a dedicated shelf or table at a comfortable height, with the attached weight selector plates neatly stored beside it. The adjustable dumbbell should never live on the floor.
Mistake #7: No Cable Management for Electronics
Modern home gyms increasingly include electronics: Bluetooth speakers, TVs or monitors for streaming workouts, tablets or phones for training apps, smart watches for tracking, and fan units or air conditioning units with their associated wiring. As electronic equipment multiplies, so does cable complexity — and in a space where people are moving heavy objects, jumping, and lying on the floor, exposed cables are a serious safety and maintenance concern.
The most common cable management failure in home gyms is the power strip situation: a single power strip placed on the floor, with cables from multiple devices running along the ground in loose, tangled runs. Cables on gym floors get stepped on, run over by equipment wheels, damaged by moisture and rubber flooring chemicals, and tripped over constantly.
Effective cable management for home gyms involves three principles: elevation, concealment, and consolidation.
Elevation
Elevation means getting cables off the floor. Use wall-mounted cable raceways or conduit to run power and audio cables along the wall at baseboard height or higher. Where cables must cross a floor zone — such as a power line running to a treadmill in the center of the room — use a rubber cable protector designed for gym or industrial environments.
Concealment
Concealment means hiding cables from view wherever possible. In a dedicated gym room, cables can be run inside the wall cavity between a power outlet and a mounted TV or speaker. In a garage gym, surface-mounted cable raceways in matching wall colors provide a nearly invisible solution without requiring drywall work.
Consolidation
Consolidation means minimizing the number of independent cable runs. A single power strip mounted at shoulder height on the wall, fed by a single cable from the outlet below, allows all device cables to reach it from above without touching the floor. This is far cleaner and safer than running individual cables from devices down to a floor-level strip.
Additional Tips
Additional cable management tips for home gyms:
- Label every cable at both ends. When you need to unplug something specific, you should be able to identify it without tracing the entire run.
- Use velcro cable ties rather than zip ties for bundles. Velcro allows reorganization without cutting; zip ties are permanent and require replacement each time you need to reconfigure.
- Keep charging stations off the floor. A mounted shelf near the door with USB charging ports and device hooks keeps phones, watches, and wireless earbuds charged and organized without creating floor-level cable hazards.
Mistake #8: Forgetting About Seasonal Storage Needs
Home gym organization is not a static problem. Training needs change by season, by training block, by goal cycle, and by life circumstance — and an organization system designed only for your current equipment and current routine will struggle to accommodate these shifts.
The classic example: a home gym owner who trains primarily for powerlifting in the winter will use a barbell, plates, squat rack, and a bench every session. Come spring, they add outdoor runs and drop one lifting day. Their battle rope — unused for four months — sits coiled on the floor taking up space. The ski machine they used for conditioning all winter needs somewhere to live while the rowing machine comes back into rotation for the summer conditioning phase.
Seasonal storage needs are one of the most overlooked small home gym organization mistakes because they only reveal themselves over time. A system that works perfectly in month one may be dysfunctional by month six as equipment usage patterns shift.
How to Approach Seasonal Storage
Building seasonal flexibility into your organization system from the start requires a few specific strategies:
- Designate a seasonal storage zone: Reserve one area of the gym — ideally a closet, an upper shelf, or a wall-mounted overhead rack — specifically for equipment that is not in the current training rotation. When an item falls out of use, it goes to the seasonal zone rather than cluttering the main training area.
- Use stackable storage for bulky seasonal items: Equipment like sleds, jump boxes, battle ropes, and agility ladders are large but seasonal for many athletes. Stackable bins or designated shelf areas with labeled spots for each item make seasonal rotation clean and systematic.
- Audit your equipment every training block: Every eight to twelve weeks, walk through the gym and identify anything that has not been touched in that period. Either integrate it deliberately into the next training block or move it to seasonal storage.
- Plan for holiday and gifted equipment: Home gyms have a curious tendency to receive new equipment around holidays — birthday gifts, Christmas purchases, impulse buys during New Year sales. Planning a storage spot for anticipated additions before they arrive prevents the common January scenario of new equipment piled in the corner with nowhere to go.
One additional seasonal consideration is climate. In garages and basements, temperature and humidity fluctuate significantly across seasons. Rubber equipment, cables, and leather accessories can degrade in high humidity; iron weights rust; electronic equipment can be damaged by condensation. Building climate management into your seasonal planning — whether through a dehumidifier, proper ventilation, or protective storage for vulnerable equipment — protects your investment and keeps the gym functional year-round.
Putting It All Together: Building a System That Lasts

Addressing these small home gym organization mistakes individually will make a meaningful difference, but the real power comes from addressing them as an interconnected system. Poor planning leads to equipment without storage. Equipment without storage leads to floor clutter. Floor clutter makes vertical storage harder to implement. Missing small-item storage creates daily friction. Plate and dumbbell chaos wastes space and creates hazards. Cable disorder adds safety risk. Ignoring seasonal needs causes the whole system to degrade over time.
The most organized home gyms share a few common characteristics: they were planned before they were equipped, every item has exactly one designated home, storage systems use vertical space aggressively, floors are treated as sacred training zones, and the system is reviewed and updated regularly as needs change.
Start by walking your gym today and identifying which of these eight mistakes are currently present. Prioritize the most impactful changes first — clearing the floor and implementing vertical storage typically deliver the biggest immediate improvements in both safety and perceived space. Then work through the remaining issues methodically, building a system where every piece of equipment has a place and every place has a clear purpose.
A well-organized home gym is not just more pleasant to look at. It makes you more likely to train, safer when you do, and faster to get in and out of sessions — which is the whole point of having one in the first place.
Related Article: Home Gym Design Mistakes That Ruin Your Space


Leave a Reply