
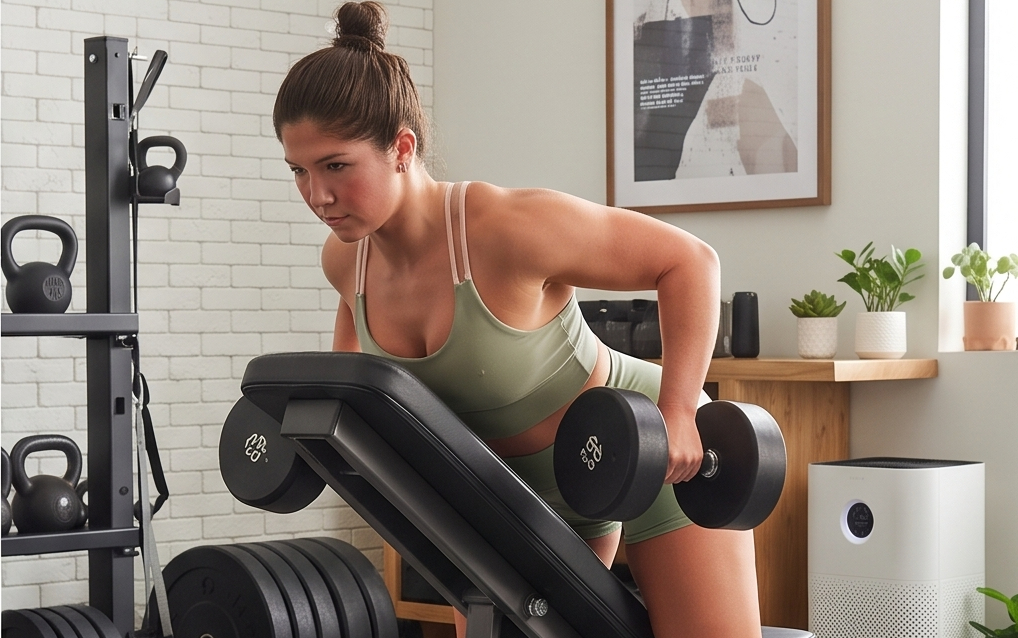
You’ve got dumbbells. You’ve got a bench, or something close enough to one. What you don’t have is a $2,000 row machine sitting in the corner of your garage — and you’re wondering if that means you’re stuck with sloppy bent-over rows for the rest of your training life. You’re not. A chest supported row home gym setup is one of the easiest wins in strength training: no machine necessary, no compromise on results- just a bench, a decent amount of weight, and the right technique.
This is one of the first exercises I teach people who are building out a home gym, essentially solving a problem most people don’t realize they have; using momentum instead of muscle to move weight. Below, I’ll walk you through exactly what a chest supported row is, why it belongs in your home program, and how to set one up with equipment you likely already own.
What Is a Chest Supported Row?
A chest supported row is a back exercise where your chest and torso rest against an inclined surface — a bench, most commonly — while you row weight toward your body. That contact point is the whole point. It removes your lower back and hips from the equation, so the muscles doing the work are the ones that should be: your lats, rhomboids, rear delts, and biceps as a secondary mover.

Compare that to a standard bent-over row, where you’re hinged at the hips, bracing your spine, and fighting to keep your torso stable while also trying to pull weight. A chest supported row home gym version strips that instability out entirely. You’re not managing two jobs at once — stabilize and pull — you’re just pulling. That’s what makes it such a reliable back builder, at home or anywhere else.
Benefits of Doing Chest Supported Rows at Home
You can’t cheat your way through it. Without your hips free to swing, there’s no body English to lean on. Every rep is muscle, not momentum — which means the numbers you hit are numbers you actually earned.
It’s dramatically easier on your lower back. If bent-over rows have ever left your low back cranky the next day, chest supported rows are the solution. The bench absorbs the load your spine used to stabilize.
It’s a smart option if you’re training around a back issue. A lot of clients who’ve had lower back flare-ups still want to train pulling muscles — this lets them do it without the aggravation.
It takes very let time or energy to set up. A chest supported row home gym station doesn’t require a squat rack, a cable stack, or floor space you don’t have. A bench and a pair of dumbbells gets you most of the way there.
Equipment You’ll Need for a Chest Supported Row Home Gym Setup
You have more options here than you’d think, at almost any budget.
Ideal setup:
An adjustable weight bench set to a 30–45 degree incline. This is the gold standard because it lets you dial in the angle that best matches your torso length and range of motion. [LINK: best adjustable benches for a home gym]
No adjustable bench? Use a sturdy incline surface.
A firm ironing board propped securely, a solid ottoman, or a flat bench with the head end elevated on plates or blocks all work. The requirement is simple: it needs to hold your body weight plus load without shifting.
Load options:
Dumbbells are the most versatile choice for a home setup — they let you row unilaterally and adjust weight in small increments. Resistance bands anchored to a low point work well too, especially for smaller spaces. If you own a barbell and an incline bench with enough clearance underneath, you can load a barbell row this way as well.
No bench at all?
Lie prone on a stability ball with your chest supported, or stack couch cushions on a sturdy elevated surface — a coffee table or ottoman — to create the same incline. It’s not elegant, but it works while you’re deciding what permanent setup makes sense.
If you are interested in the ideal chest supported row set up, here are some of the pieces of equipment I’d recommend.

A compact, budget-friendly bench with multiple incline settings, making it easy to dial in the exact angle a chest supported row needs without eating up much floor space.

A sturdier, higher-capacity option built for lifters who plan to load heavier over time — the added stability holds up well once you move past dumbbells into barbell work.

Power block Adjustable Dumbbells
A space-saving way to cover a full range of rowing weights without a rack of individual dumbbells — one set adjusts as your strength progresses.

How to Do a Chest Supported Row at Home: Step-by-Step
- Set your incline. Position your bench at roughly 30–45 degrees. A steeper incline shifts emphasis toward the upper back and rear delts; a flatter angle targets the lats more directly.
- Lie face-down, chest fully supported. Your sternum should rest against the pad with your feet planted or braced behind you for stability. There should be no gap between your chest and the bench.
- Set your grip and starting position. Let your arms hang straight down, dumbbells (or handles) directly below your shoulders. Shoulder blades should be relaxed, not shrugged, at the bottom.
- Initiate the row from your back, not your arms. Drive your elbows up and back, leading with your shoulder blades. Think about pulling your elbows toward your hips, not just curling weight toward your chest.
- Squeeze at the top. Pause briefly when your elbows pass your torso and your shoulder blades are pinched together. This is the rep — don’t skip it to move faster.
- Lower with control. Reverse the movement slowly, resisting the weight all the way back to a full arm extension. The eccentric is where a lot of the muscle-building work actually happens.
- Breathe on rhythm. Exhale as you row up, inhale as you lower. Don’t hold your breath through the whole set — it spikes unnecessary tension.
Takeaway: film your first set from the side. Most people are surprised to see how much they’re using their arms instead of their back — the video won’t lie to you.
Common Mistakes to Avoid
Loading too much weight, too soon. Because the chest supported row home gym version removes momentum, people who are used to cheating on bent-over rows often overestimate what they can lift here. Drop the ego weight for the first few sessions.
Skipping the squeeze at the top. Rowing halfway and immediately reversing course cuts the exercise’s effectiveness in half. That top-end contraction is where the back muscles are actually forced to work.
Rowing to the wrong spot on the torso. Pulling straight to your chest overworks the rear delts and shortchanges the lats. Aim for the lower ribs or upper abdomen instead, with elbows tracking back, not out.
Rushing the lowering phase. Letting the weight drop on the way down turns half the rep into dead time. Control it — that’s where you’re building the muscle, not just moving the weight.
Takeaway: pick one mistake from this list, watch for it specifically in your next session, and correct just that one thing before adding load.
Chest Supported Row Variations for Home Workouts
Dumbbell chest supported row. The most accessible variation — allows independent arm movement and easy weight adjustments as you progress.
Resistance band chest supported row. Anchor a band low and behind your bench. Great for smaller spaces or lighter recovery days, and it adds constant tension through the whole range of motion.
Incline bench barbell row. If your bench has enough ground clearance and you own a barbell, this lets you load heavier for strength-focused phases. It requires more space and setup than the dumbbell version, so it’s best once you’ve confirmed you have the room for it.
Training Tip: rotate between two variations across your week — dumbbell for volume, band or single-arm for accessory work — rather than doing the same version every session.
Sets, Reps, and Programming Tips
For general strength, 3–4 sets of 6–8 reps with a challenging load works well. For hypertrophy — building visible back thickness — shift to 3–4 sets of 10–15 reps with a slightly lighter weight and a stricter tempo.
Chest supported rows pair naturally with a home push/pull split, or as the primary back movement on an upper body day. Most clients get strong results training this movement once or twice a week, giving 48 hours between sessions for recovery.
Related Post: Best Strength Training Programs for Beginners
FAQs
Can I do chest supported rows without a bench? Yes. A stability ball, a sturdy ottoman, or a stack of firm cushions on an elevated surface can all substitute in a chest supported row home gym setup while you decide on a permanent bench.
What muscles do chest supported rows work? Primarily the lats, rhomboids, and rear delts, with the biceps assisting as secondary movers. Because your lower back is fully supported, it isn’t engaged as a stabilizer the way it is in a bent-over row.
Are chest supported rows better than bent-over rows? Not strictly better — different tools for different jobs. Chest supported rows isolate the back and protect the spine; bent-over rows build more total-body stability and posterior chain strength. Many home programs benefit from both.
How heavy should I go on a chest supported row? Start lighter than you think you need. Without momentum to lean on, most people find their true rowing strength is lower than what they were moving with a bent-over row.
Building the Environment That Builds You
A chest supported row doesn’t require a machine, a gym membership, or a room full of equipment — just a bench, some load, and the discipline to do the rep right. That’s the SOMA philosophy in miniature: your home gym isn’t a convenience, it’s the environment your transformation is actually built on. The right setup, even a simple one, removes the excuses standing between you and consistent training.
If you’re still figuring out what belongs in your space — bench, dumbbells, what to prioritize first — grab our free [Home Gym Planning Checklist] to map it out before you spend a dollar.

Leave a Reply